This is going to be a super quick tutorial on how to accept payments with Stripe payment processor and node.js. At Browserling we're moving to Stripe right this very moment so I thought I'd write this quick post. Stripe is the most incredible payment processor - it took me like 30 minutes to figure everything out. Everything is well documented and works like a charm!
First, you will need the node-stripe module. Install it through npm, as always:
npm install stripe
Next, you'll need to login into Stripe, and setup a plan:
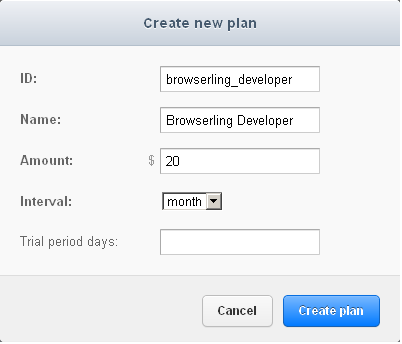 Setting up a new Stripe plan.
Next, you'll need to find the test and live keys that are used in the payment code. They are located in Account Settings -> API Keys.
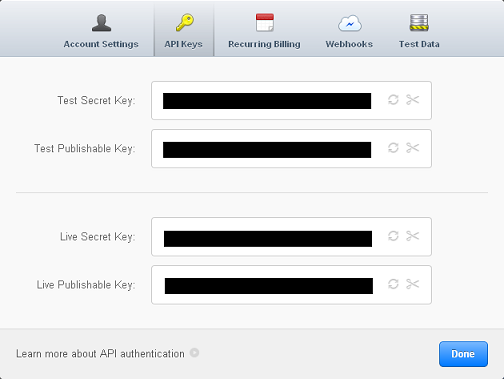 Stripe keys are located in Account Settings -> API keys.
Next, you'll need to include Stripe's JavaScript library in your HTML code:
<script type="text/javascript" src="https://js.stripe.com/v1/"></script>
Next, you'll need to setup an HTML form with card name, cvc, expiration date, amount (in cents!). You don't need to ask the name or address, that stuff is old school:
<div id="stripe-form">
  <form action="/plans/browserling_developer" method="POST" id="payment-form">
    <div class="form-row">
      <div class="cc-text">Card Number</div>
      <input type="text" size="30" autocomplete="off" class="card-number"/>
    </div>
    <div class="form-row">
      <div class="cc-text">CVC</div>
      <input type="text" size="4" autocomplete="off" class="card-cvc"/>
    </div>
    <div class="form-row">
      <div class="cc-text">Expiration (MM/YYYY)</div>
      <input type="text" size="2" class="card-expiry-month"/>
      <span> / </span>
      <input type="text" size="4" class="card-expiry-year"/>
    </div>
    <input type="hidden" name="amount" value="2000" id="cc-amount">
    <button type="submit" class="submit-button">Submit Payment</button>
  </form>
</div>
<div id="error" class="hidden"></div>
<div id="success" class="hidden">Thanks for signing up at Browserling!</div>
Next, you'll need to generate a token when the form gets submitted, and submit it to your node.js application, instead of submitting credit card number and other info:
var publicStripeApiKey = '...';
var publicStripeApiKeyTesting = '...';

Stripe.setPublishableKey(publicStripeApiKey);

function stripeResponseHandler (status, response) {
  if (response.error) {
    $('#error').text(response.error.message);
    $('#error').slideDown(300);
    $('#stripe-form .submit-button').removeAttr("disabled");
    return;
  }

  var form = $("#payment-form");
  form.append("<input type='hidden' name='stripeToken' value='" + response.id + "'/>");

  $.post(
    form.attr('action'),
    form.serialize(),
    function (status) {
      if (status != 'ok') {
        $('#error').text(status);
        $('#error').slideDown(300);
      }
      else {
        $('#error').hide();
        $('#success').slideDown(300);
      }
      $('.submit-button').removeAttr("disabled");
    }
  );
}

// http://stripe.com/docs/tutorials/forms
$("#payment-form").submit(function(event) {
  $('#error').hide();
  // disable the submit button to prevent repeated clicks
  $('.submit-button').attr("disabled", "disabled");

  var amount = $('#cc-amount').val(); // amount you want to charge in cents
  Stripe.createToken({
    number: $('.card-number').val(),
    cvc: $('.card-cvc').val(),
    exp_month: $('.card-expiry-month').val(),
    exp_year: $('.card-expiry-year').val()
  }, amount, stripeResponseHandler);

  // prevent the form from submitting with the default action
  return false;
});
Next, you need to setup a route handler in node.js web server for all your plan names. In this tutorial I'll handle just browserling_developer plan:
var express = require('express');

var stripeApiKey = "...";
var stripeApiKeyTesting = "..."
var stripe = require('stripe')(stripeApiKey);

app = express.createServer(express.bodyDecoder);

app.post("/plans/browserling_developer", function(req, res) {
  stripe.customers.create({
    card : req.body.stripeToken,
    email : "...", // customer's email (get it from db or session)
    plan : "browserling_developer"
  }, function (err, customer) {
    if (err) {
      var msg = customer.error.message || "unknown";
      res.send("Error while processing your payment: " + msg;
    }
    else {
      var id = customer.id;
      console.log('Success! Customer with Stripe ID ' + id + ' just signed up!');
      // save this customer to your database here!
      res.send('ok');
    }
  });
});
That's it! This simple node.js code handles POST requests to /plans/browserling_developer, and creates a new customer at Stripe. Notice that it uses req.body.stripeToken and doesn't even touch credit card info.
I have never worked with a payment processor which was easier to setup. It's a pure pleasure to use Stripe!